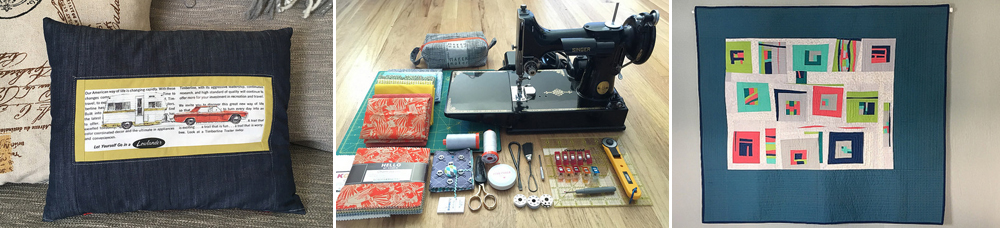

Inspiration struck at 5:30 pm instead of the usual early morning this week.The evening before I had read about the Curated Quilts Mini Challenge. The deadline was June 15th. Ha Ha, I thought, that’s Saturday. It’s just a mini quilt. It’s Monday night. I could whip that out. Ha ha! There was this idea in my head. Wonky stars. The challenge stated a star theme. I scrambled for a scrap of paper. If I didn’t get the idea on paper it would either be gone in a flash or haunt me all night long not letting me sleep.

The next evening after work I wandered into the sewing studio and gazed at the fabric. I wondered what the color pallet for the mini challenge was. Peach, coral, violet plum, denim, dark teal and light grey. I started selecting solids to play with as I pondered how to make wonky stars. Isn’t YouTube great! Just Google that and Oh Yeah, I’m on my way. I didn’t even look at a video. A picture popped up of a wonky star and it just jelled.

The background had to be denim. A dark wash. Light Grey was too predictable for me. I love that look but I challenged myself to reach for the stars (cheesy pun). The centers should be scrappy and random. The points would be solid but the scraps called me to use a few patterns as well. Another inspiration hit from my recent class with Katie Pedersen of, Sew Katie Did, where I learned her technique to make the Double Trouble quilt.

Have you ever created something that in your mind is very directional? This is the top and that is the bottom. I’ve done this many times now. Once complete, flip it over. How do you feel about the block placement now. It blows my mind how often I prefer what I thought was the bottom as the top. Trick of the eye! Once quilted it really became obvious.

Here is the same image but flipped. It seems more balanced when flipped over. Very curious!

The quilting was challenging. After I started I second guessed myself wishing I had done straight lines. It was late in the evening so I set it aside to see it again with fresh eyes in the morning. In the end I kept going and I’m so pleased with how it came together. In fact I am over the moon!!! I really love a bad pun. Hee Hee!


Knife Edge Binding or Face Binding was used to give a clean solid edge to the mini quilt. Debbie Jeske of A Quilters Table posted a link on instagram to Bloomin Work Shop‘s tutorial on her blog. Love how flat the edges came out on this quilt. And its super square.

Have a Starry Night. Happy quilting!
~Diana

